n8n Docker Compose Setup Tutorial: A DX-First Guide

We've all been there. You find a shiny new tool, run npm install -g, and suddenly your global Node environment is throwing dependency conflicts like confetti. Or worse, you spin up a quick Docker container, spend three hours building the perfect automation workflow, restart your machine, and watch in horror as your ephemeral container takes all your hard work into the digital abyss.
We've all stared at our terminal downing coffee, right?
Welcome back! As we discussed in Episode 1, n8n is a powerhouse for automating our content pipelines. But before we can start wiring up APIs, we need a rock-solid foundation. Today, we are going to build an n8n docker compose setup tutorial that prioritizes Developer Experience (DX).
Shall we solve this beautifully together? ✨
The Mental Model: Your Automation Apartment
Before we look at a single line of YAML, let's visualize what we are actually building.
Think of your Docker host as an apartment building. We are going to rent out a specific unit for n8n. But n8n can't just be an empty room; it needs specific furniture to function properly for our content pipeline.
1. The Brain (The Container): This is the n8n application itself. It executes our workflows, talks to external APIs, and runs the UI.
2. The Memory Bank (The Data Volume): n8n uses a SQLite database by default to store your credentials, workflow JSONs, and execution history. If we don't map this to a persistent volume on our host machine, n8n gets amnesia every time it restarts.
3. The Rulebook (Environment Variables): This tells n8n how to behave. What timezone should cron jobs use? What is the external URL for webhooks?
Here is a visual representation of how these pieces interact:
When we build our docker-compose.yml, we are simply writing a declarative blueprint of this exact mental model. We are telling Docker exactly how to wire up the ports, where to store the data, and what rules to follow.
Deep Dive & Code: The Perfect docker-compose.yml
Let's get pragmatic. You could run n8n with a massive, unwieldy single-line docker run command, but from a DX perspective, that's a nightmare to maintain, share with your team, or version control.
Instead, we use Docker Compose. It allows us to declare our infrastructure as code. Create a new directory for your project, and inside it, create a docker-compose.yml file.
Here is the optimized, DX-first configuration we use at BriefStack:
version: "3.8"

services:
  n8n:
    image: docker.n8n.io/n8nio/n8n:latest
    container_name: n8n_content_pipeline
    restart: unless-stopped
    ports:
      - "5678:5678"
    environment:
      - N8N_HOST=${SUBDOMAIN}.${DOMAIN_NAME}
      - N8N_PORT=5678
      - N8N_PROTOCOL=https
      - NODE_ENV=production
      - WEBHOOK_URL=https://${SUBDOMAIN}.${DOMAIN_NAME}/
      - GENERIC_TIMEZONE=${GENERIC_TIMEZONE}
    volumes:
      - n8n_data:/home/node/.n8n

volumes:
  n8n_data:
    name: n8n_data
Why this specific configuration?
Let's break down the reasoning, because understanding the Why is much more important than just copy-pasting the What.
1. The Restart Policy (restart: unless-stopped)
If your server reboots, or if the n8n Node.js process crashes due to an out-of-memory error (perhaps you tried to process a 5GB JSON file?), Docker will automatically spin it back up. You get to keep sleeping. DX win.
2. Environment Variables & The .env File
Notice how we aren't hardcoding our URLs or timezones? We are pulling them from a .env file.
Create a .env file in the same directory:
# .env
DOMAIN_NAME=yourdomain.com
SUBDOMAIN=n8n
GENERIC_TIMEZONE=America/New_York
Crucial DX Tip: Setting GENERIC_TIMEZONE is mandatory for content pipelines. If you don't set this, n8n defaults to UTC. When you build a workflow to "Publish my blog post at 9:00 AM EST," it will publish at 4:00 AM EST instead. We've all made that mistake once; let's not make it twice.
3. The Data Volume (n8n_data:/home/node/.n8n)
This is the most critical line in the file. Inside the container, n8n runs as a non-root user called node and stores its SQLite database and configuration in /home/node/.n8n. By mapping this to a named Docker volume (n8n_data), we ensure that even if we destroy the container (docker compose down), our workflows and credentials safely persist on the host machine.
Firing It Up: First Login and UI Walkthrough
With your docker-compose.yml and .env files in place, open your terminal and run:
docker compose up -dThe -d flag runs it in detached mode, meaning you get your terminal prompt back immediately.
Now, open your browser and navigate to http://localhost:5678. Because this is your first time booting up this specific volume, n8n will ask you to set up an owner account. This is a local security measure; your data isn't being sent to a cloud service.
Once you create your credentials, you'll be greeted by the n8n dashboard.
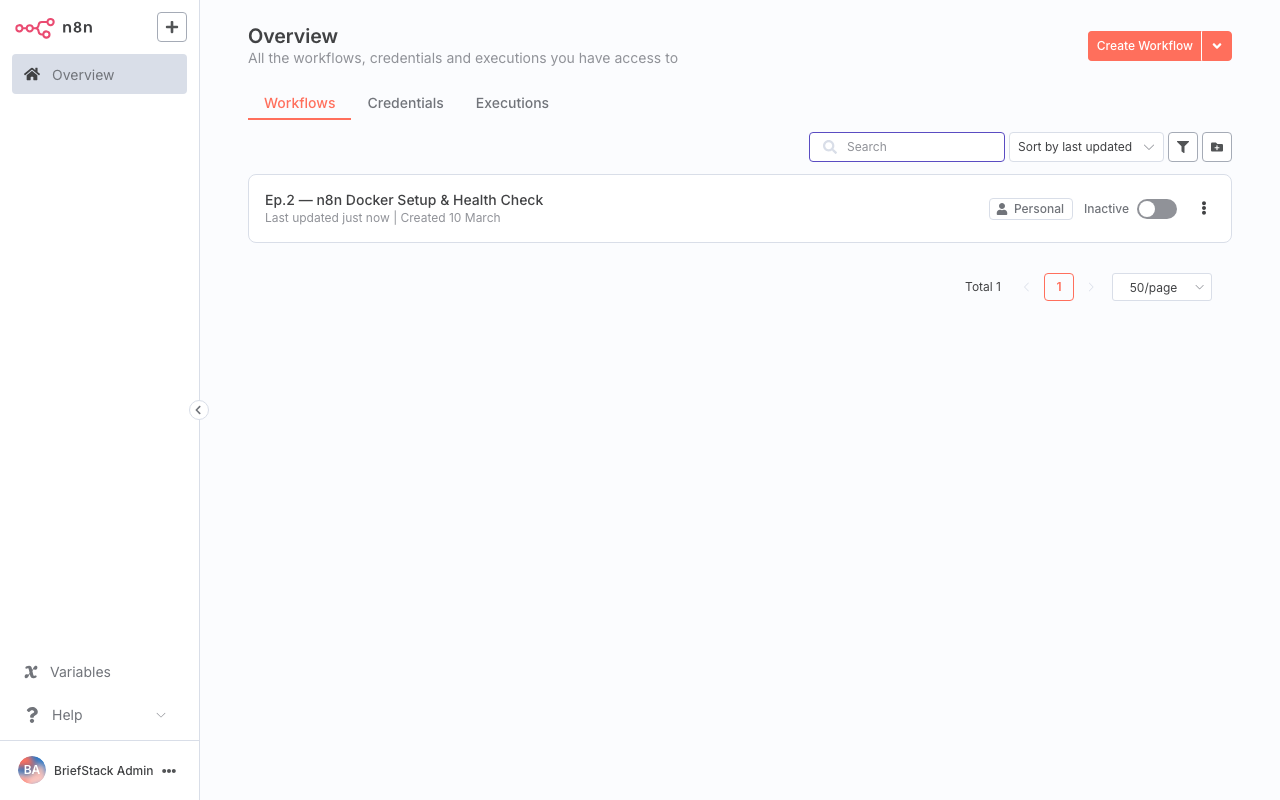
The n8n dashboard is your command center. From here, you can organize your workflows with tags, view execution logs, and manage your saved credentials for various APIs.
Notice how clean and uncluttered the interface is? This is where n8n shines from a Developer Experience standpoint. It doesn't overwhelm you with unnecessary metrics right out of the gate.
Click on "Add Workflow" in the top right corner. This takes you to the workflow editor, the canvas where the actual magic happens.
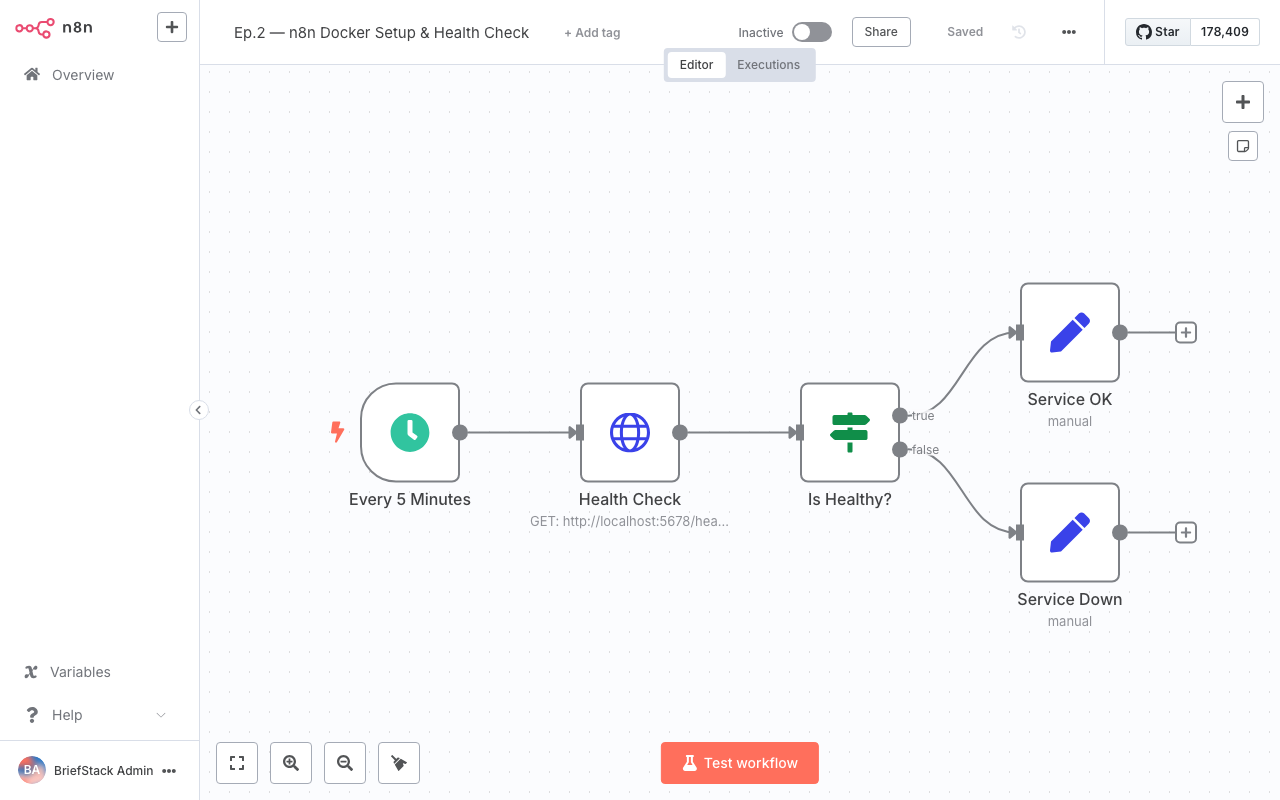
The workflow editor canvas. This visual node-based approach allows you to see the exact flow of JSON data from one API to the next, making debugging incredibly intuitive.
Imagine writing a Node.js script to pull an RSS feed, parse the XML, filter out old posts, format the text, and push it to a CMS API. You'd have to handle HTTP requests, error catching, retries, and data mapping.
In this canvas, you simply drag a node, connect a wire, and visually map the JSON fields. The mental overhead drops to near zero. You can actually see your data pipeline.
Performance vs DX: Why Docker Compose Wins
As architects, we constantly weigh Performance against Developer Experience. Let's evaluate our n8n Docker Compose setup through both lenses.
The Performance Perspective
Running n8n via Docker introduces virtually zero performance overhead compared to a bare-metal Node.js installation. Docker containers share the host's OS kernel.Furthermore, by using Docker Compose, we can easily set resource limits if we need to. If you are running n8n on a small $5/month VPS, you can add a deploy block to your docker-compose.yml to ensure n8n never consumes more than 512MB of RAM, preventing it from crashing your entire server.
The DX Perspective
This is where Docker Compose truly shines.1. Portability: Want to move your n8n instance from your local laptop to a production server? Just copy the docker-compose.yml, the .env file, and migrate the Docker volume. Run docker compose up -d on the new server, and you are exactly where you left off.
2. Clean Up: If you ever want to completely remove n8n, you don't have to hunt down hidden npm folders or global binaries. A simple docker compose down -v wipes the slate perfectly clean.
3. Upgrades: Updating n8n to the latest version is a two-command process that takes 15 seconds: docker compose pull && docker compose up -d. No npm audit fix nightmares, no breaking dependencies.
This setup respects your time. It lets you stop worrying about infrastructure and start focusing on what actually matters: building your content automation logic.
The Wrap-up
And just like that, your automation engine is purring! 🚀
By taking the time to set up a proper docker-compose.yml with persistent volumes and environment variables, you've future-proofed your content pipeline. You have a robust, isolated environment that won't lose your data and respects your local machine's ecosystem.
Your infrastructure is way leaner now, and your Developer Experience is optimized.
In Episode 3, we are going to put this beautiful canvas to work. We'll build our very first workflow: an RSS Feed Ingestion pipeline that automatically pulls in content, parses it, and prepares it for our database.
Happy Coding! ✨
FAQ
I'm getting a "permission denied" error on my SQLite database when starting the container. How do I fix this?
This usually happens if you are using a bind mount instead of a named volume, and the host directory has the wrong permissions. n8n runs as thenode user (UID 1000) inside the container. If you are using a local folder (e.g., ./n8n_data), ensure it is owned by UID 1000 by running sudo chown -R 1000:1000 ./n8n_data on your host machine.
How do I update my n8n instance to the latest version?
Because we used Docker Compose, updating is a breeze. Navigate to the directory containing yourdocker-compose.yml and run docker compose pull to download the newest image, followed by docker compose up -d to recreate the container with the new image. Your data will remain intact in the persistent volume.
Can I install custom npm packages to use inside n8n's Code node?
Yes, but you can't do it directly through the defaultdocker-compose.yml provided above. You will need to create a custom Dockerfile that uses the n8n image as a base, runs npm install -g your-package, and then point your docker-compose.yml to build from that Dockerfile instead of pulling the pre-built image. You also need to set the NODE_FUNCTION_ALLOW_EXTERNAL environment variable.
Why do we need the WEBHOOK_URL environment variable?
When n8n generates a URL for a Webhook node (so external services can send data to your workflow), it needs to know what your public-facing domain is. If you don't setWEBHOOK_URL, n8n will generate URLs using localhost, which external services like GitHub or Stripe obviously cannot reach.