Automating Git Commits & Cloudflare Pages Deploys with n8n

We've all been there, right? You've just created some fantastic content, maybe a new blog post or a fresh set of documentation, and now comes the 'fun' part: manually committing it to Git, pushing those changes, and then remembering to trigger that deploy hook. It's a dance of context switching, copy-pasting, and sometimes, those dreaded merge conflicts. It breaks the flow, adds friction, and frankly, it's just not the best use of our brilliant developer minds! ✨
It feels like a tiny, repetitive chore that keeps us from the bigger, more exciting challenges. But what if we could wave a magic wand and have our content pipeline handle all of that for us? Today, we're going to do exactly that, transforming manual publishing into a seamless, automated ballet with n8n, Git, and Cloudflare Pages.
The Mental Model: Your Automated Publishing Assistant
Imagine a seamless river flowing from your content generation process directly into your version control, then gently nudging your deployment system. No dams, no detours, just a smooth, automated current. Our n8n workflow acts as the orchestrator, picking up your freshly baked files (like the screenshots we generated in Episode 7!), wrapping them up nicely for Git, and then sending a signal to Cloudflare Pages to say, 'Hey, new content is ready, let's go live!' It's like having a tiny, super-efficient publishing assistant working tirelessly in the background.
Here’s how we envision that flow:
This diagram beautifully illustrates how n8n orchestrates the entire process, from committing your content to Git to triggering a fresh deployment on Cloudflare Pages. Each step is a hand-off, ensuring your content moves smoothly to production.
The Deep Dive: Configuring n8n for Git and Deploys
Let's roll up our sleeves and get this pipeline humming! We'll integrate the n8n Git node to manage our version control and an HTTP Request node to ping Cloudflare Pages.
Step 1: Setting up the Git Node for Automated Commits
First, we need to tell n8n how to talk to your Git repository. This involves using the Git node, which handles everything from adding files to committing and pushing. We'll connect this after your content generation steps (like the Playwright screenshot capture from Episode 7).
Here’s how to configure the Git node:
1. Add the Git Node: Drag and drop a 'Git' node onto your workflow canvas.
2. Authentication: You'll need credentials for your Git provider (GitHub, GitLab, Bitbucket, etc.). I recommend using an SSH key or a Personal Access Token (PAT) for security. Store these securely in n8n's credentials manager.
* For SSH, you'd add the private key to n8n's SSH Key credentials.
* For PAT, you'd use a 'Generic Credential' or 'OAuth2' depending on your Git provider.
3. Repository Details:
* Repository URL: The SSH or HTTPS URL of your repository (e.g., [email protected]:your-org/your-repo.git).
* Branch: The branch you want to commit to (e.g., main or a dedicated content-updates branch).
4. Operation: Commit:
* Add Files: This is where the magic happens! You'll reference the output of your previous content generation node. For instance, if Episode 7's Playwright node outputted a filePath property, you'd use an expression like {{ $node["screenshot_capture"].json["filePath"] }}. If you have multiple files, you might need to collect them into an array first.
* Commit Message: Make it descriptive! Automated content update: {{ new Date().toISOString() }} is a good starting point, but you can get more specific based on your content type.
* Author Name & Email: Set these to something identifiable, like n8n Automation .
* Push: Set this to true to automatically push your new commit to the remote repository.
Here's a snippet of what the Git node configuration might look like for adding a file:
{
  "nodeType": "n8n-nodes-base.git",
  "type": "n8n-nodes-base.git",
  "name": "Commit New Content",
  "mode": "commit",
  "credentials": {
    "gitApi": {
      "id": "your-git-credential-id",
      "name": "Your Git Credential"
    }
  },
  "settings": {
    "repositoryUrl": "[email protected]:your-org/your-repo.git",
    "branch": "main",
    "addFiles": "={{ $node['PreviousNode'].json['filePath'] }}",
    "commitMessage": "Automated content update: {{ new Date().toISOString() }}",
    "authorName": "n8n Automation",
    "authorEmail": "[email protected]",
    "push": true
  },
  "id": "...",
  "position": [600, 300]
}
This configuration ensures that any files passed into this node are staged, committed, and pushed to your specified Git branch, all without you lifting a finger! 🚀
Step 2: Triggering Cloudflare Pages Deploys
Once our changes are safely in Git, we want Cloudflare Pages to pick them up and deploy the latest version of our content. Cloudflare Pages provides a unique 'Deploy Hook' URL for each project. A simple POST request to this URL is all it takes.
1. Find Your Deploy Hook: In your Cloudflare dashboard, navigate to your Pages project. Under 'Settings' -> 'Builds & deployments', you'll find the 'Deploy hooks' section. Copy the unique URL provided.
This screenshot shows where to locate your Cloudflare Pages deploy hook URL within the project settings.
2. Add an HTTP Request Node: Drag and drop an 'HTTP Request' node after your Git node.
3. Configure the HTTP Request:
* Method: POST
* URL: Paste your Cloudflare Pages Deploy Hook URL here.
* Authentication: Typically, no additional authentication is needed for deploy hooks, as the URL itself acts as a secret.
{
  "nodeType": "n8n-nodes-base.httpRequest",
  "type": "n8n-nodes-base.httpRequest",
  "name": "Trigger Cloudflare Deploy",
  "settings": {
    "url": "https://api.cloudflare.com/client/v4/pages/webhooks/deploy_hooks/YOUR_UNIQUE_DEPLOY_HOOK_ID",
    "method": "POST"
  },
  "id": "...",
  "position": [800, 300]
}
And voilà! Your n8n workflow now not only commits your content but also tells Cloudflare Pages to build and deploy it. Your content goes live, automatically!
Step 3: Handling Commit Conflicts (The 'What If' Scenario)
Automating Git operations is powerful, but we need to be mindful of conflicts. What happens if a manual change is made to the same file that n8n is trying to commit?
For a dedicated content pipeline like ours, where n8n is often the only writer to specific files, conflicts are less common. However, if manual edits are possible on the same branch, you have a few strategies:
1. Dedicated Automation Branch: The safest approach. Have n8n commit to a specific branch (e.g., automated-content). Then, a human can review and merge this branch into main periodically. This prevents any automated force pushes or accidental overwrites.
2. Fetch Before Commit (Advanced): You could add an earlier Git node to fetch the latest changes from the remote, then potentially rebase or merge them before attempting your commit. This is more complex to implement reliably in n8n and might require custom scripting.
3. Force Push (Use with Extreme Caution!): The Git node does have a 'Force Push' option. While it simplifies conflict resolution by overwriting remote history, it is incredibly dangerous for shared branches as it can erase collaborators' work. Avoid this on main or any actively developed branch. Only consider it for highly isolated, single-writer scenarios where you are absolutely certain no one else is touching that branch.
For our pipeline, I recommend Strategy 1: Dedicated Automation Branch. It provides a robust safety net and maintains a clear separation of concerns. You can then configure Cloudflare Pages to deploy from this specific branch, or set up a small manual review step.
Here's a look at how your workflow editor might be shaping up with these new nodes:
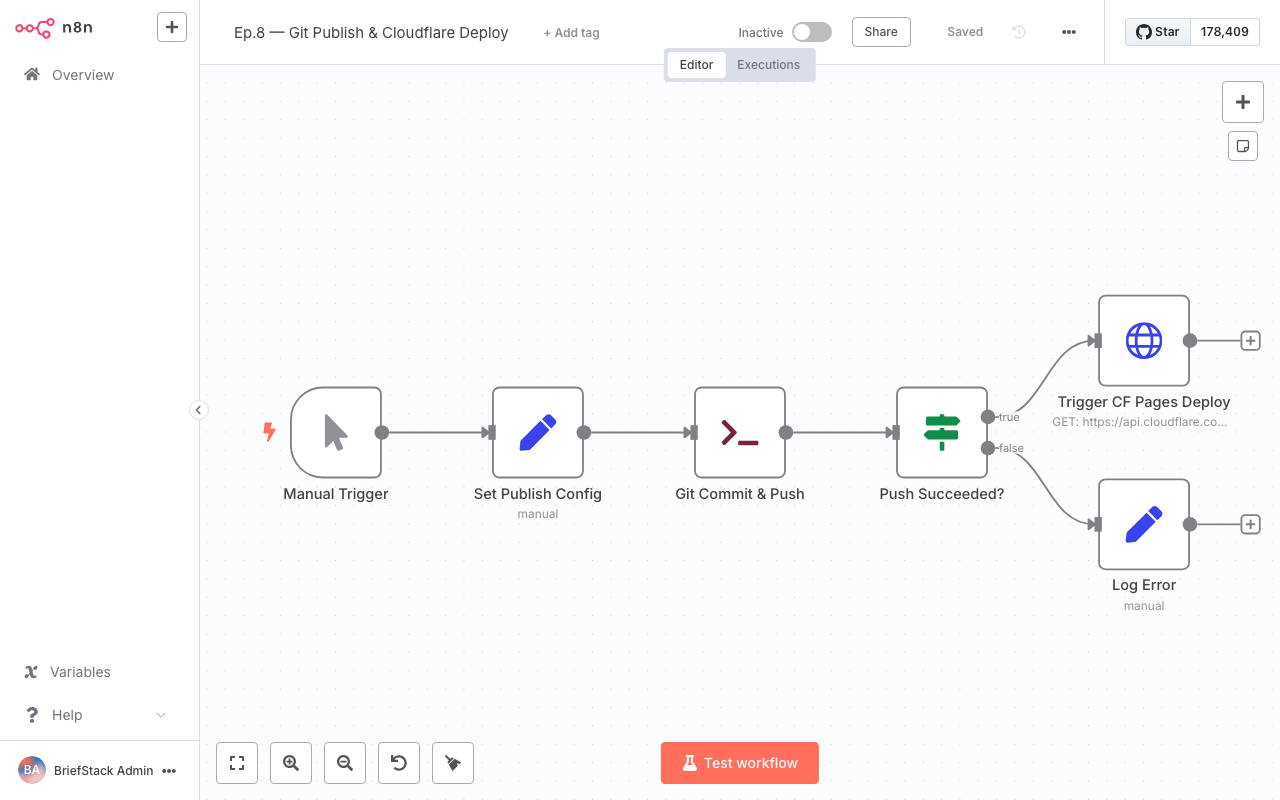
This view of the n8n workflow editor shows how the Git and HTTP Request nodes integrate into your content automation pipeline.
Performance vs. DX: A Win-Win! ✨
This automation isn't just about making things faster; it's about making our lives as developers so much better!
Performance Benefits:
- Blazing Fast Content Delivery: Your content goes from generation to live deployment almost instantly, reducing the time-to-publish from minutes (or hours!) to mere seconds.
- Consistent Deployments: Eliminates human error in the deployment process, ensuring every publish follows the exact same, reliable steps.
- Reduced Manual Overhead: Frees up server resources and network bandwidth that might otherwise be tied up in manual processes or repeated checks.
Developer Experience (DX) Benefits:
- Freedom from Repetitive Tasks: No more tedious
git add,git commit,git push, or remembering specific deploy hook URLs. Your brain is free to tackle more interesting problems! - Reduced Cognitive Load: You don't have to keep track of where content is, if it's been pushed, or if the deploy was triggered. The pipeline handles it all.
- Empowerment: Content creators (or even other automated processes) can simply output files, and the system takes care of the rest. This democratizes the publishing process.
- Earlier Go-Home Time: Seriously, imagine getting back those 10-15 minutes you spend on manual publishing tasks every day. That's real time back in your life! 💡
Wrap-up: Your Content, Published with Grace!
Phew! Your content pipeline just got a massive upgrade! You're now not just generating content, you're publishing it with grace and speed, all thanks to our trusty n8n. Think of all the coffee breaks you've earned back! ☕
By automating Git commits and Cloudflare Pages deploys, we've removed significant friction from the content lifecycle. Your components are way leaner now, and your deployment process is a well-oiled machine. It's truly a beautiful thing when code works for us, isn't it?
Next up, we're diving into the exciting world of quality gates. In Episode 9: Quality Gates: Hallucination and Duplicate Checks, we'll explore how to ensure our automated content is not just fast, but also flawless! We'll tackle common pitfalls like 'hallucinations' and accidental duplicates, making sure your content is always top-notch. Stay tuned! 🚀 Happy Coding! ✨
FAQ Section
Can I use n8n to commit to other Git providers like GitLab or Bitbucket?
Yes, absolutely! The n8n Git node is designed to be provider-agnostic. As long as you can provide valid SSH keys or Personal Access Tokens (PATs) for authentication, you can connect to virtually any Git repository hosted on platforms like GitHub, GitLab, Bitbucket, or even your own self-hosted Git server. The configuration steps for the repository URL and credentials remain largely the same.What if my Cloudflare Pages deploy fails? How would I know?
The HTTP Request node in n8n will return a response from Cloudflare Pages. If the deploy hook URL is incorrect or Cloudflare experiences an issue, the HTTP Request node might return an error status code (e.g., 4xx or 5xx). You can add error handling branches in n8n (using an 'IF' node or 'Error Trigger' node) to catch these failures and, for example, send a notification to a Slack channel or email address. This way, you're always in the loop!Is it safe to automate Git commits, especially on a 'main' branch?
Automating commits requires careful consideration. For dedicated content generation pipelines that only write to specific files, it can be safe, especially if you're using a dedicated branch for automation (as recommended in this post). However, directly committing and force-pushing to a 'main' branch that sees active human development carries risks of overwriting changes. Always assess the potential for conflicts and choose a strategy (like a dedicated branch or pre-commit checks) that aligns with your team's workflow and risk tolerance.Can n8n trigger deploys for other hosting platforms besides Cloudflare Pages?
Definitely! The principle of using an HTTP Request node to trigger a deploy applies to many platforms. Most modern hosting providers (Vercel, Netlify, Render, etc.) offer similar 'build hooks' or 'deploy webhooks' that can be triggered with a simple HTTP POST request. You would just need to find the specific URL and any required headers/authentication for your chosen platform and configure the n8n HTTP Request node accordingly.